 I was approached via internet by a client to create this fantastic lion pendant in 3d relief sterling silver. The drawing is the client's own art work and created a big challenge for me given that I've usually done my wax carving from my own images. Well away we go!
I quickly decided to work on the head and the cross portions separately, so if I stuff up it's only half of the whole! I had to start on the head because that face fascinated me.
I started by producing a whole sheet of the left image in exact dimensions (2.5 inches x 1.5 inches) multiple times to use as line drawings on the wax tablet. Then I started by literally cutting the lines of the face through the paper onto the wax - with many images to start anew with once one image got too shredded.

Once I was satisfied with the line drawing emerging on the wax I started the difficult part - removing the wax that doesn't belong. I spent a lot of time (4 months!) doing this slowly, methodically and carefully to ensure I got it right the first time. Here is a first draft of the head. The sides were still about 3 mm thick (mouth being closer to 4 mm) and the client wanted the mane thinner. So more careful carving.

The best part of this carving wax is that it's opaque and, when held to light, you can compare the shades of green to see where it is thin or thick. Here is the final head carving held so the client could see how it was made thinner. The head is really cool at this point.
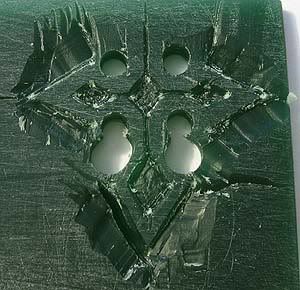 So the next task was to do the cross. Now given how complicated the head is, I was actually dreading the cross more because although it appears simple (all straight lines) I was more apprehensive about this shape because it demanded perfect hand control to achieve symmetry. To create the curves I used the bench drill and various bit sizes and then carved the points after this. I used a lot of line grids to help control the symmetry at this point. It then sat like this for over a month while I tried to figure out how I was going to make the points of the cross at a 45 degree angle meeting on the edge like a V, or a wedge. My technical minded husband gave me a good idea that worked a charm. Use the angled side of a plastic ruler as the slope there is about 45 degrees AND gives me a hard straight edge to use as a template! Eureka! After this point the pendant wax carving process went along very smoothly.
 After getting everything done, I melted the join between the cross and the head to create this final wax carving mold for the casting company. One thing I've learned over the last few projects is that the more I make the wax nice and smooth, the more smooth my casting will be. So I used an old bedsheet to smooth away all scratches.
Here's the casting (after a bit of clean up) before I put the star sapphire in a bezel setting and finalised the bail.
And here is the final pendant compared to the original drawing again!

I'm really pleased with the end results and look forward now to other original works like this one!
No comments:
Post a Comment