
With a wire cutter, round needle pliers and some continuous wire, a head pin can be made in under a minute for a fraction of the cost, especially if using silver, gold filled or gold wire.
 I am a sucker for textured, hammered, twisted, tortured wire. I love it, the whole rustic look. I was first exposed to the whole concept when I was looking at a website by Connie Fox of www.jatayu.com.
 At the beginning of my wire working fetish, I wanted keenly to be able to capture a stone in wire work and learn more about the "rainbow wrapping" being done by various artists in Colorado, USA in 2005. I searched for a good, comprehensive tutorial to buy that would not only teach me the foundations of some good wire working but also enable for me to make the complicated ideas I had in my head for jewellery.
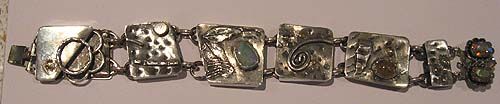
 Fusing requires a lot of concentration and careful flame control. In an ideal set up, I would have a bunsen burner type flame heating the back plate from underneath to get the metal hot and then use another flame to do the final melting of the top surface from above. Sadly, I don't have a pluthera of materials in my workshop, so I used one plumbers LPG torch from above with the biggest head possible which leaves very little room for minute control.