-->
I was asked to create a sturdy filigree butterfly with aquamarine and blue sapphire, and had no idea where to start but loved the idea of this challenge. The first step was to agree on a design with the client so we both understood what the dimensions and style would be when finished. I perused jewellery magazines from my collection (always save your old beading mags!) and found 3 variations to inspire doodles. Here is what I came up with and sent to the client.


The client chose a symmetrical version of the middle butterfly so I worked on the image in Photoshop and added a few other features for the final doodle.
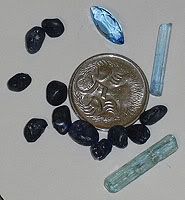
Then stones were chosen, I usually show a coin for reference to gauge size, as photos just are so hard to picture in real life.
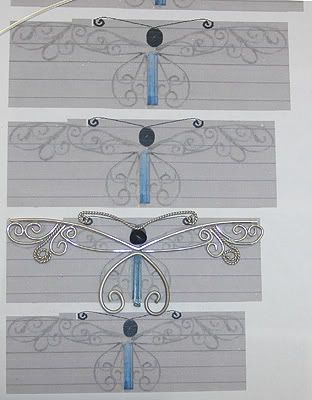
At this point I had to find the doodle that best fit the actual size of the stone, so in Word I copied the photo into a single page in varying sizes and printed out. Then just matched the butterfly that fit the stones best. As the client did not have a preconceived idea of how big the broach should be, the butterfly size was determined by this stage.
Then I used the correctly scaled drawing to make all of the individual wire components of the piece. This is important to do as when the soldering process starts it works more efficiently to have everything ready at hand to go. I also constructed the two bezels for the two stones to build around too.
When making each component, I carefully filed all ends to ensure there would be no sharp, scratchy points after soldering as trying to fit files into tight corners after construction is finished is difficult at best to do without marking the whole piece. Holding each component individually gave me greater access to all these points. I also buffed to get rid of scratches left by my pliers and just tried to make sure each wire component was as shiny, smooth and clean as possible before soldering began.
I had to decide now in which order to construct the piece. I put the project on hold and went back to the Internet to watch the professionals at work.
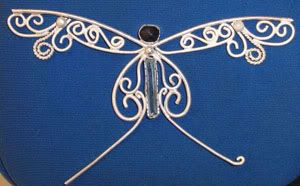
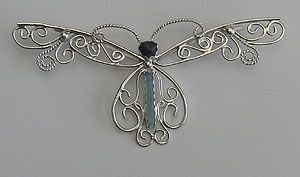
In the photo above the bottom wing inner spirals are not created. As the aquamarine crystal bezel would take up room I opted to leave the components open for planning later on. I ended up creating these in situ while doing the final soldering phase (see photo below). The bottom wing had room for 1 spiral on each side of the bezel, so I used 1 long wire bent in half to really make that middle body join strong. (Note, top wire of top wing is one wire, outer part of bottom wing is 1 piece of wire and inner part of bottom wing is one wire.)
STUDY STAGE
Of course my first visit was straight to my www.beadingforum.com.au friends in the metal working section and got the BEST free “see it as it is built” by Jeanne Rhodes-Moen on her website http://www.jeannius.com/evolution/index.htm Ms. Rhodes-Moen has kindly done an intense step by step photographic journey of how she creates a pendant complete with how she sets up her work space, has everything placed and the actual order in which her pendant is created. I kept coming back to this page time and time again when I would get to the next step in my own creation. I also borrowed the book “Silver Threads, Making Wire Filigree Jewelry” (http://www.silverthreadsfiligree.com) by Jeanne Rhodes-Moen to peruse several filigree projects for gaining insight and confidence.
On Youtube there were a lot of links that came up on the search "making filligree". There is a short documentary on Greek filigree work, which isn’t step by step, but just watching how they go about filling in the gaps and soldering the individual pieces together was informational. http://www.youtube.com/watch?v=PCEY-p53Woo Made me very jealous of that solid marble slab worktop onto which they can solder directly as well!
Another set of videos were a 3 part free youtube demonstration by jeanniusdesigns (http://www.youtube.com/user/jeanniusdesigns) on how to utilize a pick for soldering while creating 3D filigree pendant. Somehow I wasn’t surprised to find that jeanniusdesigns was also Jeanne Rhodes-Moen. This video set is amazingly detailed with her techniques, which gave me the confidence to go ahead on my own filigree adventure. In this video set, the artist opened my eyes wide as she soldered gold-filled wire into her sterling silver pendant!
SOLDERING STAGE
I ended up getting too engrossed in the construction to take step-by-step photos of my butterfly like in Ms. Rhodes-Moen’s Evolution page. I really felt I was soldering by the seat of my pants at times hoping that the new join would melt before previously done joins melted first. Just a note that I only used hard solder during the whole construction of my butterfly. I made sure I had a very flat surface to work on which kept the butterfly flat too in case other joins melted accidentally. The only time I used easy solder was to attach the pin mechanism on the back at the very end. Darn near melted those antennae during the process!
Here is the order in how I soldered the butterfly together (left and right sides at same time):
1. Soldered the 4 outer top-wing spiral tails together as one piece.
2. Soldered the inner 2 spirals of top-wing together.
3. Soldered the bottom wing 3 components finished (outer wire, top spiral and bezel setting) at the top only.
I then worked on the top wing using my fingers, files and pliers:
1. Worked the spiral fittings of the 4-spiral piece and filed until there were clean joins to all other spirals and the upper wing bar.
2. Worked on the inner 2-wire piece until it snugged up against the 4-spiral piece and met in the middle for clean connection to the bottom wing AND to the top wing wire.
3. Placed all 5 top wing pieces (top bar, 4 components) together tightly and soldered where ever one component touched another. This step took a few firings as I kept adding solder to more wire connections as I fiddled with the whole thing to see where a wire may move. Keep up this step until the top wing is a solid unmoving piece.
BOTTOM WING
1. Worked with pliers, hands and files the spirals inside the bottom wing until they touched each other AND the bezel. Figured out there was too much space at the bottom and had to insert a few wires on each side to make bottom piece solid. You could say I winged it. (joke drum roll)
2. Keep soldering joins until it is one solid piece!
3. I curled the newly inserted wire ends (see photo below).
CONNECT EVERYTHING
1. I set the head bezel, top wing and bottom wing components up against each other until it was all touching, balanced and looking good and then used tons of solder on all of the joins. If an old join melts that's okay because you have the filligree piece on a nice flat surface so nothing melts out of place.
2. Make sure everything has enough points of contact joins (the more wires you join together, the stronger the filligree piece becomes).
3. Put big balls over the ugly, busy joins. Do this by putting flattened pieces of solder UNDER the ball where it will sit. Often though there is enough solder in the larger joins that the ball will stick if the join is reheated.
ANTENNAE
1. I melted one set of antennae.
2. Attached second set just above head bezel.
3. Worked ends so that they bend back and over and set on top of top wing and then soldered the joins.
4. Nearly melted half the second antennae during that process.
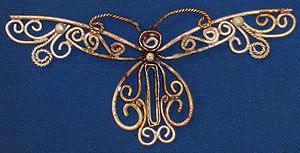
It ALWAYS amazes me how that yucky, cruddy piece of yellow and black stuff cleans up so pretty.
WHAT I LEARNED
I learned a few things during this process that made the soldering process easier from watching the above information:
Invest in the right tools to do the job at hand. I bought a wire-soldering screen, which would allow me to solder from underneath and bind items together securely. I purchased a proper smooth non-pitted fire tile so I had a good surface to work on instead of my hebel bricks that tend to get stuck to heated parts of my pieces.
Have a plan! Have a drawing of what you intend to create and study it for where a stronger wire may be needed to create a sturdier item. I found, after studying my drawing, that a strong bar along the top of the wings that is all one bent piece would help give the pin overall strength. At the end it really did make a difference, as those wings were unbendable!
Let newly soldered joins cool by air as quenching can make the join break, especially if you didn't use quite enough solder.
Use your drawing in real size to help create all wire pieces needed before you start soldering. This will make the final soldering process go much quicker.
Go slowly. Go slow when making wire components and when soldering!
When creating the individual components so that symmetry is achieved when creating a mirror image on both sides. Clean up all marks and pointy, scratchy ends as created.
Plan where to place bezels and make sure the bezels are tall enough to work efficiently. Often you need to attach wire to a bezel – and all of us know what a hassle it is when you solder to a bezel only to have it joined to something tall that makes the bezel NOT bend over the stone!
Study other people’s videos before diving in.
You can make your own twisted wire rather than buying it twisted.
Filigree work is easiest on flat surfaces. In the case of a ring, construct it flat and then curve it when all filigree work is done.
Good luck in your own filigree adventure!
No comments:
Post a Comment