
Part one features how to make the "coiled focal bead" opposite the fancy hook. As it is on the Jewelry Making Daily website, it requires you to register first, which is free. Part One Link here.
Part two features the actual bangle construction and creation of her "swan hook" as Connie Fox calls it. Part Two Link here
 Here is the bangle I crafted while following Connie Fox's tutorial - literally one of my first wire worked pieces ever! It was a rough attempt, done in copper which is inexpensive to practice with, using what I had on hand. But I definitely learned the technique!
It was a fun tutorial and I also learned how to pre-twist my own wire using my husband's cordless drill.. Here is a video (which is selling their own special bit) to show the concept. However, I just twist the ends of the wires together and tighten that into the drill chuck and twist away.


The coiled bead technique was enough to whet my appetite for wire working bracelets for a long time and I have continued to construct these bangle style bracelets as they are just so addictive.
 The coiled coil bead just adds a strong visual section that creates a lot of textual interest. Playing with different wires such as round wire (photo left) or half round wire (photo right) or even twisted coiling wire gives very different feeling coiled beads.
It is a great way to hide trouble areas, errant wires or just fill in space on a project.
While Connie Fox works in rather thicker gauges of wire, the technique works perfectly well with thinner gauge of wire for a more delicate look. Eventually as I delved deeper into the different styles of wire working artists, I saw amazing coiled beads in miniature by a group in the US. After careful inspection of their photos, I realised that the coiled bead technique was used in the construction of their fancier looking beads - just done with much finer wires and more core wires held together inside the coil.
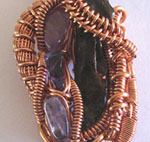
What you don't see now is a couple of wires hidden inside the coiled bead I didn't know exactly HOW to terminate! All directed up behind the pendant and terminated neatly.
I created a free tutorial on how to do the more complicated coiled coil bead with the multiple core wires. While recently teaching a workshop on this tutorial at the December 2011 Retreat for the Aussie Beading Retreats , I was asked "why use 3 small core wires?" as we were all fumbling with 5 wire jelly fish like projects. Imagine the core wires done in copper with the outer coiling wire done in a really fine sterling silver wire. With the final larger wire filling in the gaps a brass or gold wire. If you can visualise, you would have copper peeking out between sterling silver and a final twist of gold here and there to help marry up all three metals in one project. Or have those core wires be from the many different coloured wires now available on the market! This is one of those tutorials I strongly recommend to learn, then really explore with a lot of different materials.
I would love for you to share your coiled bead you create from this tutorial!
 I have tried to link back all borrowed photos to the original place. Unmarked photos are of my own work.
 Happy Wiring!
Download Tutorial PDF Here
1 comment:
Thank you!! Excellent tutorials ;^)
Post a Comment