Showing posts with label wire work. Show all posts

Wednesday, June 22, 2011

Wire Properties - Work Hardening

I have written a series of articles covering some basic how to's and general information on working with wire and sheet metal so will post excerpts of the article here for free hopefully once a week.

Also during this time, some exciting fun technique tutorials will be available for sale on my website in a month time, so about August 2011.

The blog notes will be a companion for most of my tutorials and offer the absolute novice some really good solid know how for working with wire work. Stuff it took me several years to learn through trial and error.

I have written these articles for you to use but if you use the information or wish to cite, please give credit where credit is due and reference my website www.yourjewellery.com. - Amanda Katz

Metal Qualities

The most common metals to work with in jewellery are brass, copper, silver and gold but each metal has different qualities that endure or repel the jeweler. These qualities are hardness/softness which affects ability to cut, bend and manipulate. In ease of working without soldering the metals are easy to hardest as follow: fine silver, sterling silver, copper, gold then brass. Economics often dictates what metal is chosen for a design as well.

Wire Technique

Hardness

Wire comes in three rates of hardness that equates to work hardening and annealing of wire before it is sold. As you work with wire, it gets work hardened, or the molecules in the wire line up more rigidly thus making the piece of wire less flexible and more brittle.

Work hardening happens by moving the metal around such as cutting, hammering, coiling or bending and even light filing. Work hardened metal is necessary for a project requiring stiffness like the pin on a brooch or for supporting a heavy weight like a heavy necklace with a large focal bead. One disadvantage of overworking the wire is eventually it becomes brittle and will snap with too much force.

When wire becomes too work hardened, a flame from a torch or even the kitchen gas stove is applied until the metal becomes a light pink (not red) and quenched in water. By applying high temperature evenly to the wire, it allows the molecules to loosen up which returns the wire to a bendable, softer form to work with again. One side effect of working wire with flame (such as sterling silver) is that the surface becomes covered with fire scale which requires pickling, sanding back and then polished up again either by hand or in a tumbler filled with steel shot. Thus when planning a project, it is better to plan ahead to know what hardness of wire is required before diving into the deep end.

Commercial wire is available in three hardnesses: Dead soft, half hard and full hard.

Dead soft means the wire is recently annealed, therefore is very flexible and soft to bend. There will be quite a bit of manipulation left in dead soft before it becomes brittle thus is best for wire coiling and weaving free hand sculptures or setting stones without solder. Dead soft is extremely easy to bend without much force so is unsuitable to supporting heavy weighted beads.

Half hard means the wire has been worked enough to give it a small amount of stiffness. It requires more force to bend than dead soft so is suitable for weight bearing projects, jump rings, and chain mail in thicker gauges. Thin gauges of half hard can still open by force of project weight though.

Full hard has been work hardened to the point that a considerable amount of pressure is required to manipulate the wire. Very suitable for heavy weight support, ear wires and projects where just a few bends in the stiff wire is necessary. Because full hard has already work hardened, it will become brittle quickly. Full hard is good for wire ring shanks, support frames for wire wrapping and jump rings in finer gauges.

Choosing the wire required is important in the planning stages of a project. Using the right stiffness of wire is important also to reduce strain on the hands, as coiling full hard by hand around a mandrel would be a much harder task force wise versus using dead soft wire.

Copper and sterling silver wire both have about the same work hardening properties, similar dead soft feels right on up to brittle breaking point when overworked. Brass wire tends to be stiffer even after annealing and will achieve overworked breaking point much quicker than copper or sterling silver in the same project. Fine silver, being 99.9% pure silver starts off dead soft and after much work hardening will possibly achieve half hard but will never become brittle to breaking point.

Next Week: Wire Gauge

Friday, July 23, 2010

Making a Filigree Butterfly

PLANNING STAGE

-->
I was asked to create a sturdy filigree butterfly with aquamarine and blue sapphire, and had no idea where to start but loved the idea of this challenge. The first step was to agree on a design with the client so we both understood what the dimensions and style would be when finished. I perused jewellery magazines from my collection (always save your old beading mags!) and found 3 variations to inspire doodles. Here is what I came up with and sent to the client.


Friday, August 14, 2009

The Muse is Revealed!


I know it's a little hard to see. I will see if I can get a bigger one soon. I've hand made a PMC stick that is a flower base. The cut up flower petals was the muse - used to be a circle pendant which I cut into 4 sections and - made into a flower. The flower part is a pin and the beetle is a pin so I have two separate pins here that work together.

I also used ndeble (mispelled I know) weave to make the purple calcyx for the flower.
The little story here is there is a beetle that lives on a special flower (hence the similarities in their patterns) with the seed pod.

My beetle pin with wings that echo the pattern on the shell pendant. The body is bead woven in peyote stitch like an amulet bag and the insides has clove oil so the beetle is a bit of clove smell. The shell part is bead embroidered with a little wire work for the antennae.


I won an award on the Muse contest! Here is the website for the winner's page:
http://www.thebeadersmuse.com/winners2/

I was awarded the "handmade components" award for my pin. And I can finally post photos of my entry!

Good night!

Amanda

Thursday, July 24, 2008

Turk's Head Knot Ring


It's been a while since I posted on my blog but I've tried a new technique inspired by the metal working turk's head knot guru Loren Damewood on http://www.golden-knots.com/

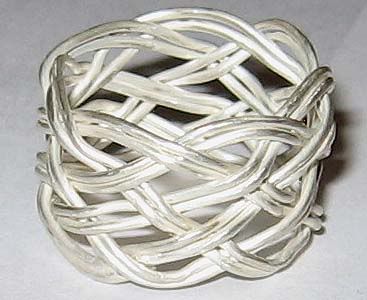
It has been a very long journey since I first saw Loren's website and then started searching the internet frantically to find out how to do this elusive knot (see below for where I found tutorials). I made about 4 leather knots to get the feel of the technique before trying it in silver wire. the above photographed ring is 0.8 mm gauge sterling silver wire and is a single strand of wire passed through the knot twice.

Here's some things I've learned on the way:
1. Gauge of wire discussion. This 0.8 gauge was too thick. Even for fine silver I reckon. Use 0.6 gauge maximum and you can go down quite thin to do more pass throughs. I found the 24 gauge (what's that, 0.4?) was too thin for a loose ring, that would need to be a really tight ring.

2. Ring size: These rings act like Chinese finger traps - if you open the lattice up the ring gets taller and thinner, if you squish it down it gets shorter and wider. If I were to anneal my ring I could potentially squish it down to 1 cm tall and a size 7, or M. I could open it up and make it smaller too. This is the good thing about these rings if you don't solder it all together - they are adjustable by plus or minus 1 ring size!

3. Mandrel versus ring size versus how much wire to cut? The 16 mm dowel mandrel gave me a size 6, or L ring that is 1.5 cm tall on my finger. The 19 mm dowel mandrel would give you a size 9, or like P, that would be 1.5 cm tall on the finger. On golden_knot (see below for web address) there is a good page there that he uses geometry to figure out wire length to cut for what ring size. I cut 2 meters here and ended up with half a meter left after the double pass on my ring.

4. Drilling holes spacing on mandrel: the further apart the two peg rows are, the more lacey and open your ring is going to be. this also means that a lacier, taller ring will adjust better to say plus 2 or even 3 ring sizes more. In a wire that stiffins up nicely, that's okay. But with fine silver or thin gauge wire you will find your ring bending out of shape, ring size a lot.

5. Number of passes: This is up to you. If you're going to do one pass only, use sterling silver or a wire that will be stiffened so that your final ring doesn't distort at the end. If doing multiple passes, like on golden_knot (see below) then you will want to use fine silver and a thinner gauge.
5A. If you will be doing multiple passes around your mandrel, do not use tight tension on your first pass around the knot or this will warp how your second and third passes will sit nicely. Let it be a little loose so that on the second pass there is space above and below your pegs to lay the second row of wire nicely. My ring looks wonky a bit because I pulled way too tight the first pass around the knot (so my second row wants to sit parallel to my first pass, not snugly next to.)

How to do the Knot:

Get to know this knot first. The Turk's Head knot is fun and incredibly varied. I'm still trying to figure out the underlying over and under pattern but - aside that there are two three resources I found um... (forgetting word again) can't do without them... INDISPENSIBLE!!!

First http://www.golden-knots.com/ He is the god of doing metal work and turk's knots. He gives a LOT of information on what makes up the knot, the terminology and is very free with showing different knots in string - but very stingy with the metal tips. Read through all of his information so you can become knowledgeable about the knot structure and what's going on.

Now how a turk's head would transfer to wire. On www.Youtube.com, donbscout has done a fantastic series of 9 videos to teach you how to do a 7 bight, 6 lead turk's head knot using his "recipe" book he is advertising here. It's great because it transfers directly to wire and tells you where you're supposed to go under and over and what pins to go to.

Write down donbscout's instructions.

However, while donbscout uses a square template jig, you need a round jig for a ring - do a trip to your local hardware store (gotta love them!) for 19 mm diameter wooden dowling and 16 mm wooden dowling and a 1.2 or 1.3 drill bit.

Here is how you make your wooden dowel mandrel: http://www.mailleartisans.org/board/...c=9438&forum=1 (please note this is a 5 bight, 9 lead ring. Just adjust the number of lines on your paper to equal 7 instead if using donbscout's instructions.)

The idea is the holes you drill into the doweling needs to be the same size as the wire you have to stick in. I drilled with a 1.2 bit and poked 1.25 (14 guage?) copper wire as pegs, snug but can take them out again.


Now refer to http://www.mailleartisans.org/articl....cgi?key=20054 for someone's tutorial on actually doing a turk's head ring in wire. This person has used the same number of pegs from donbscout's tutorial on youtube. So you see the necessity to view all these resources.

You really will find a combination of referring to all three above resources helps set out understanding of how to do multiple passes through a knot rather than doing 3 separate wires at once.

If you try, email me a photo I'd love to see!