
After completing a ton of fusing metal experiments, what do I do with all of these silver plates! I had been drooling over the designs of jewelry artist Nancy Blair and thought about emulating the box look of her bracelets. Why not use my fuse experiments to make up the links in a bracelet!
I didn't save many progress photos as I really got into the crafting zone as I textured and finalised each plate. I used a variety of typical workshop tools to make large expanses of plain back plate more interesting including an allen key, screw driver and punch. It's amazing what can become a jewellery tool when you are looking for interesting textures!
I wanted to make each plate something more, built up on a box to give each little platform more emphasis. I thought long and hard how to make the boxes - set each one like its own step bezel setting, put thick wire sandwiched between bottom and top plate for each link? I wanted to create something that wouldn't trap water in case the bracelet got wet.
At the same time, my family were playing with paper cut out models of buildings and cars. Each piece would be cut out with the printed seen side, and little white tabs sticking off that would be used to glue it to other pieces. So I had the idea of building the link bottoms with tabs coming up off the bottom section at 90 degree angles onto which the textured top section of each link would sit. Confusing to describe, so I took photos instead to show.

 I traced the outline of each plate lightly (visible in following photos as lighter pencil lines). Then used geometry (I was floored I was actually going to use this stuff from high school!) to create bottom models that were slightly smaller in size as the tops and tabs that would be folded up at 90 degrees where the top plate would sit flush. The flat, long dents in the back plates are a wide screw driver hit with a hammer.
 Each tab folding up is placed to give room either side where I will attach half circle square s/s wire to which I will link each one together with jump rings. The allen key and punch gave these two plates an interesting background.
 One one plate, the triangle shape that resulted was going to create problems trying to link the bracelet together, as rectangles are so much easier. The original concept of this square was to create a bezel setting for a beautiful mabe pearl cab I owned as a centre piece of a flower. Then use the bottom section to make the whole link rectangle. In this photo, the bezel setting is standing up ready to go. Only, when I got it all soldered together to the bottom section, I had forgotten to make anything on the empty space of the bezel setting onto which the pearl to sit. The pearl kept falling straight through so I nixed the whole idea, curled the bezel strip over on itself and left the flower as an all metal outline.
 The fused plate with the PMC leafs and setting would have a gorgeous colourful opal set so I felt this plate had enough going on to do require any more textures. The upper face of the link can be seen in a little stronger pencil line.
After each link box was created, and hinges soldered on, I cut a bunch of oval shaped half round 1.5 mm x 1 mm s/s wire jump rings to link the bracelet together. The divots of the screw driver, allen key and punch divots were also darkened with Liver of Sulfer treatments. The photos below show that I didn't have any good polishing tools, only hand held sand paper.

 The start of the bracelet features the flower. I tried to texture a thin sheet of PMC and then solder that above the base plate. It textured beautifully. Then, when it came soldering that above the hinges, all definition of the texture disappeared and the sheet seemed to just melt into nothing special. It worked out alright though as it still hid the ends of the half circle square hinges.
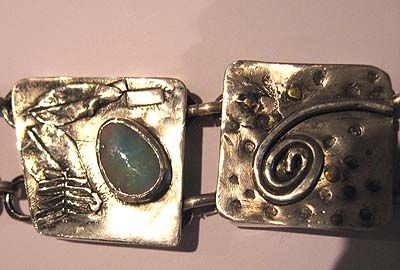
 The opal and spriral are the two middle links.
The link with the spiral feature has some more gold looking balls on it in the final version. I used 2 brass rivets to hold the top plate to the bottom section just to try the technique out. Absolutely riveting.
The opal doesn't show much colour in this photo, but is a stunning one with a lot of rainbow play.
 The plates with the yellow sapphire and the smaller one of the original experiment of 3 different ball material made a nice combination right before the clasp. The square s/s wire hinges can be seen better sticking out of the right bracelet link.
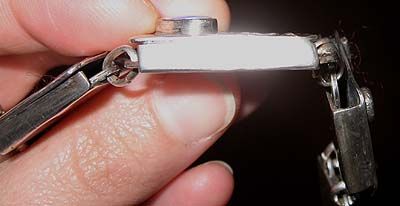 And one of my biggest pet peeves when I am drooling over another artist's designs is that you only ever get to see the pretty front. It's hard to find an artist who will take photos of the functional sides and back of their pieces to show. So here it is, the boxes are each about 5 mm tall.
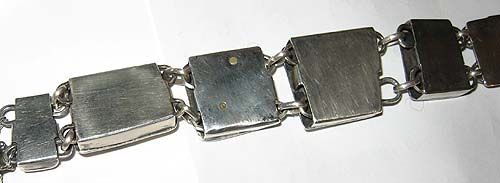
On the back of the bracelet, you can see each plate with all the polishing sins of a novice without good polishing tools. I have since bought a flexible shaft dremel, obtained the Habras polishing wheels and given this bracelet a good once over to take all those visible scratches out. The clasp eventually was changed to a 2.5 cm/ 1 inch tube clasp.
I love wearing this bracelet, but keep it for evenings out rather than everyday wear. The all metal connectors and hollow box forms means I carry my own bell percussion instrument as the bracelet tinkles constantly with movement.
No comments:
Post a Comment